Installation instructions with Weber products
These installation instructions apply to all rabbet edged Tulppa panels at least 20 mm thick.
WEBER SYSTEM COMPONENTS:
Finnfoam Oy products:
Tulppa spacers (If using for a sheet metal element bathroom)
Tulppa Z brackets
Tulppa O brackets
Weber products:
Adhesive mortar: weber rex fix Renovation tile fix
Adhesive/sealing compound: Ardex CA 20 P or Casco AquaSeal
Waterproofing: weber WP Waterproofing membrane
Reinforcement fabric: webervetonit FC or webervetonit ST 120 mm
Inlet cuff: webervetonit FC or webervetonit SC
Attachment to a timber or metal frame
Preparing the installation surface or frame
The rabbet edged Tulppa panels are designed to be installed horizontally with an on-center stud spacing of 600 mm. The Tulppa panels’ innovative, patented joint solution and installation system make installation significantly faster and easier. The concealed attachment at the edge using Tulppa Z brackets and the rabbeted solution combined with a sealing adhesive compound ensure safe, waterproof joints in one working stage.
For fittings and bathroom furnishings, mounting planks are installed on to the framework (support strips or plywood). Lightweight fixtures, such as towel hooks and toilet paper holders, may be attached on to the surface of the tiling using Ardex CA 20 P or Casco AquaSeal adhesive compound.
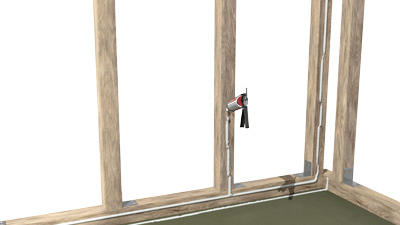
Installation wedges are used to prop the Tulppa panels 2–3 mm off the floor. It is advisable to gather a sufficient number of installation wedges before you begin the installation.
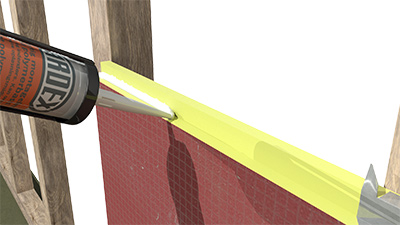
Attachment to the base
The actual installation begins with the application of a 1–2 mm wide line of Ardex CA 20 P or Casco AquaSeal adhesive compound on each frame beam behind the panel, including the support strips.
The lowest Tulppa panel on the wall is placed on top of wedges and pressed on to the frame. During installation, ensure that the back side of the panel placed against the studding is higher than the front side, i.e. the rabbeting is placed the right way up. It is not necessary to saw off the rabbeting on the long side of the Tulppa panel placed against the ground. This is done to leave sufficient space for the sealing compound applied to the joint.
The panels are attached to the framework of the wall at the edge using Tulppa Z brackets and countersunk screws. Use at least 5 Z brackets per panel (spacing 600 mm). The panel should be attached to each frame stud, so the spacing of the studs affects the number of brackets used. The length of the screw must be at least twice the thickness of the attached panel. With a metal frame, it is easier to use self-tapping (self-drilling) screws.
The Tulppa panels are also attached to the framework of the wall approximately 25 mm above floor level using Tulppa O brackets spaced approximately 600 mm apart. First, Ardex CA 20 P or Casco AquaSeal adhesive compound is applied on the back of the O bracket or the surface of the Tulppa panel (at the fixation point of the Tulppa O bracket), after which the Tulppa O bracket is screwed in place. Finally, excess adhesive compound is smoothed over the surface of the panel with a trowel. Ardex CA 20 P or Casco AquaSeal adhesive compound is applied to the joints before laying the next panel layer.
Panel seams and corner joints
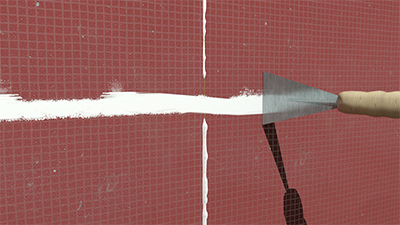
At the corners, a gap of 1–3 mm is left between the panels to be filled in with Ardex CA 20 P or Casco AquaSeal adhesive compound. The gap must be filled in thoroughly up to the surface of the panel. The panels are pressed firmly together, and any excess adhesive paste is smoothed over the joint using a trowel.
Once the adhesive compound is surface dry, the corners and the intersection of the floor and the wall are sealed using weber WP waterproofing compound and webervetonit FC or webervetonit ST 120 mm reinforcement fabric. Ensure that no air pockets are left under the reinforcement fabric pressed on top of the fresh layer of waterproofing compound. It is not necessary to separately waterproof the horizontal seams. Any vertical seams are waterproofed in the same manner as corners, but it is not necessary to waterproof the horizontal seams between the panels according to the system.
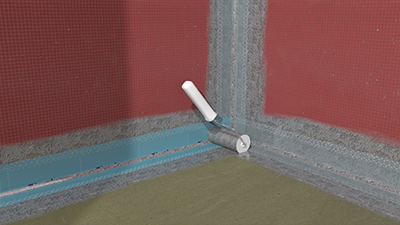
Wall and floor joint
Concrete floor of a wet room is waterproofed according to the weberSafe waterproofing work instructions. The gap between the Tulppa panel and the floor is filled in with Ardex CA 20 P or Casco AquaSeal adhesive compound and any excess compound is smoothed over the surface of the panel (please note that the waterproofing membrane brought up from the floor must adhere to 30–50 mm of the surface of a clean Tulppa panel). The waterproofing membrane applied to the floor is brought at least 100 mm up the wall, which means that it will also cover the Tulppa O brackets used near the floor level. Webervetonit ST 120 mm reinforcement fabric is pressed on to a fresh coat of weber WP waterproofing compound such that no air pockets are left between the fabric and the below surface. Finally, the webervetonit ST 120 mm reinforcement fabric is covered completely with weber WP waterproofing compound.
Passages
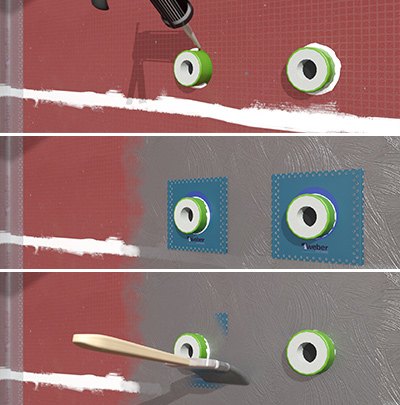
The gaps between passages and Tulppa panels are sealed during the attachment of the panels using Ardex CA 20 P or Casco AquaSeal adhesive compound. Pipe inlets are sealed once the adhesive compound has dried using weber WP waterproofing compound and webervetonit FC or webervetonit SC inlet cuffs. During sealing, you must ensure that no dried-up excess installation adhesive is left between the pipe cuff and the pipe.
Weber WP waterproofing compound is spread around the pipe to cover the area on to which the pipe inlet cuff is placed. The pipe inlet cuff is laid on top of a fresh coat of weber WP waterproofing compound and rubbed smooth to push out any air below the cuff. Finally, weber WP waterproofing compound is used to completely cover the inlet cuff, which must also extend over the collar on to the surface of the Tulppa panel.
Tiling
You can begin tiling once the Ardex CA 20 P or Casco AquaSeal sealing compound is dry. The drying will usually take 1–24 hours depending on the products and conditions, thickness of the layers, temperature, and the relative humidity of air. It is important to wipe the surfaces of the panels clean from dust and dirt with a moist cloth. Before you begin the installation, use a wet sponge to moisten the surface of the wall.